Reidbury's Kitchen

Food thoughts, recipes and billowing smoke from a home cook's kitchen in London


2 Comments

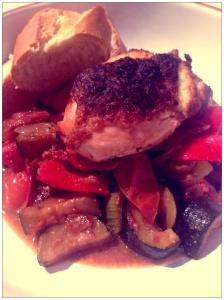
Mediterranean Chicken

Mediterranean Chicken

Mediterranean Chicken

I think everyone has a ‘go to’ meal that they cook when they have people over, or if they’re feeling like cooking a safe option. And my dish is Mediterranean Chicken – no idea where I got the recipe, but it’s super easy, tastes great and is quite a convivial dish to cook if you have people round for dinner. There’s lots of chopping and a bit of a saute that you can do before your guests arrive, and then you just bung it in the oven and chop up some crusty bread to serve with it. Then open a bottle of wine and start gossiping! The flavours are classic – it’s basically chicken with Boursin cheese under the skin sat on the top of a chunky ratatouille-type thing. There’s little liquid goes into this dish so you might worry it’ll be dry. It won’t – the balsamic mingles with the juices from the tomatoes and courgettes, along with the chicken juices as it cooks.

KB rating 8.5/10. PR rating 7.5/10

Mediterranean Chicken (serves 4)

Ingredients:

  • 4 chicken breasts with skin on
  • 115g Boursin cheese
  • 450g courgettes
  • 2 red peppers
  • 450g plum tomatoes (or regular will do)
  • 4 sticks celery
  • 30ml olive oil
  • 275g onions, roughly chopped
  • 3 garlic cloves, crushed
  • 8 sun dried tomatoes, roughly chopped
  • 1 tsp dried oregano
  • 2 tbsp balsamic vinegar
  • 1 tsp paprika
  • Salt and pepper
  • Ciabatta or crusty bread, to serve

Method:

Preheat the oven to 190C. Loosen the skin of the chicken breasts without removing it, to make a pocket. Divide the cheese into four and stuff one quarter under the skin of each chicken breast so it forms an even-ish layer.

Cut the courgettes and peppers into similarly sized chunky pieces. Quarter the tomatoes and slice the celery sticks.

Heat 2 tbsp of the oil in a large, shallow flameproof casserole. Cook the onions and garlic for 4 minutes until they’re soft and golden.

Add the courgettes, peppers and celery and cook for a further 5 mins.

Stir in the tomatoes, sun-dried tomatoes, oregano and balsamic vinegar. Season well.

Place the chicken on top, drizzle over the rest of the oil and season with salt and paprika. Bake in the oven for 35-40 mins or until the chicken is golden and cooked through.

Serve with plenty of ciabatta or crusty bread.


Leave a comment

Spiced Bulghar Pilaf with Fish

Spiced Bulghar Pilaf with Fish

Spiced Bulghar Pilaf with Fish

I’m trying to be a bit healthier in my food options at the moment, and I took a look on the Good Food website for low-ish calorie dinner options with fish. There’s so many to choose from, but I narrowed the options down and Paul suggested he was in the mood to try Spiced Bulghar Pilaf with Fish. The ingredients list made this sound quite Middle Eastern and I expected the bulghar wheat to be full of flavour given the fish is not massively seasoned (just a bit of salt, pepper and lemon). Unfortunately I was disappointed with the end result. I kept tasting this as I cooked it, and realised early on that the flavour was mostly coming from the cumin seeds, but even then it was quite bland. Perhaps the rose harissa I used wasn’t as spicy as it should’ve been (although the jar was freshly opened, so I don’t know how true that is), or perhaps my expectations were too great, but overall I felt like it needed more heat. I added Ras el Hanout spice mix AND some chilli powder, along with more lemon but in the end I was still disappointed. Also, you cook the pilaf in a pan and then add the fish on top to cook through – as expected, the pilaf started to burn onto the bottom of the pan before the fish was cooked! Another challenge. But, Paul did like this dish so maybe I just personally didn’t get on with it…

KB rating 5/10. PR rating 7.5/10

Spiced Bulghar Pilaf with Fish (serves 4)

Ingredients: 

  • 1 tbsp olive oil
  • 2 onions, finely sliced
  • 3 carrots, grated
  • 2 tsp cumin seeds (I personally thought this was too much)
  • 2 tbsp harissa (I added another tbsp in addition to the listed amount)
  • 200g bulghar wheat
  • 6 dried apricots, chopped
  • 700ml weak chicken stock (made with one stock cube)
  • 200g baby spinach
  • 4 firm white fish fillets
  • 4 thin lemon slices

Method:

Heat the oil in a lidded flameproof casserole dish. Tip in the onions and cook for 10 minutes until soft and golden. Add the carrots and cumin, and cook for 2 minutes more. Stir through the harissa, bulghar and apricots, pour over the stock and bring to the boil. Cover and simmer for 7 minutes.

Add the spinach and stir through until just wilted. Arrange the fish fillets on top, add a slice of lemon on each and season. Replace the lid and cook for 8 mins, keeping over a low-ish heat.

Turn heat to low and cook for 7-8 minutes more until the fish is cooked through and the bulghar is tender. Season with pepper and serve.


Leave a comment

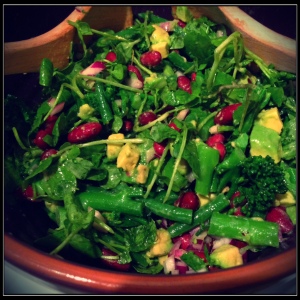
Beans and Greens Salad

Beans and Greens Salad, Olive Magazine April 2014

Beans and Greens Salad, Olive Magazine April 2014

For someone who enjoys cooking so much, I tend to be very lazy when it comes to making an effort on side dishes. I don’t really know why, but it’s something I’d like to focus more on. I decided to start this by making a salad I saw in Olive Magazine (April 2014 issue) to serve with the Greek Chicken Flatbreads I posted here. Whilst Beans and Greens Salad doesn’t necessarily sound the most exciting, it really does taste far more interesting than you’d think. It’s very fresh and zingy and works well as a side dish or, I reckon, brilliantly on its own if you added a bit of feta or chicken to bulk it up.

KB rating 8/10. PR rating 8/10

Beans and Greens Salad (serves 4)

Ingredients:

  • 1 x 400g tin kidney beans, rinsed and drained
  • 100g green beans, blanched and cut into 3cm pieces
  • 200g tenderstem broccoli, chopped into small pieces and blanched
  • 1 small avocado, peeled and diced
  • 2 stalks celery, sliced
  • ½ red onion, finely diced
  • Good handful of baby watercress
  • 2 tbsp red wine vinegar
  • 1 tsp Dijon mustard
  • Olive oil

Method:

Put the first 7 ingredients in a bowl. Whisk the vinegar and mustard together, then whisk in 3 tbsp olive oil and season. (I took the lazy option in making the dressing by adding all the ingredients to a clean jar, and shook it vigorously until everything was combined!). Add to the salad, toss everything together. Serve with crusty bread if preferred.


1 Comment

Greek Chicken Flatbreads with Tzatziki

Greek Chicken Flatbreads with Tzatziki, Olive Magazine May 2014

Greek Chicken Flatbreads with Tzatziki, Olive Magazine May 2014

I’ve been a bit absent of late, but I’m going to try and get back into the habit of posting a couple of things a week. I do have flurries of cooking, but I also seem to have flurries of posting the recipes too! I need to be better at writing these posts and focus on doing little and often! Anyway, since the weather here in London has taken a nicer turn over the last few weeks, I thought I’d post a recent recipe I tried from the May edition of Olive Magazine – Greek Chicken Flatbreads with Tzatziki. This is really simple to make and quite healthy, but it is full of flavour and definitely one I’ll be doing again. The only change I’d make is having some kind of chilli sauce to serve with this. After eating the first wrap, I felt something was missing, and Paul was spot on when he said it needed a kick of heat. I had some hot chilli sauce which worked perfectly, but reckon sweet chilli sauce or fresh chillies would work here too. I ended up serving this with a zingy salad (post to follow in a few days), but it worked on its own.

KB rating 8/10. PR rating 8/10.

Greek Chicken Flatbreads with Tzatziki (serves 2)

Ingredients:

  • Olive oil
  • 1 lemon, juiced and half zested
  • 1 tsp oregano
  • 2 cloves garlic, crushed
  • 2 chicken breasts, cut into chunks
  • 4 tbsp fat-free Greek yogurt
  • ¼ cucumber, peeled, deseeded and grated
  • 1 tbsp chopped mint
  • 2 warmed flatbreads
  • Iceberg lettuce, shredded
  • Tomato and red onion slices, to serve

Method:

Whisk 1 tbsp olive oil with the lemon zest, oregano, half the garlic and season. Coat the chicken in the marinade, and then griddle for a few minutes on each side until slightly charred and cooked through.

To make the tzatziki, mix the yogurt, lemon juice, remaining garlic, cucumber, mint and season. Spoon the tzatziki onto the breads, add the salad and top with the chicken.


Leave a comment

Chicken Pie with Leftover Roast Chicken

Chicken Pie with Leftover Roast Chicken

Chicken Pie with Leftover Roast Chicken

I’ve said before just how much a I love a roast chicken on a Sunday, but it does mean I have to think about how to use the leftovers for a midweek dinner. I usually make pasties with puff pastry, chicken, tomato and pesto but I fancied a change and ended up finding a recipe for Chicken Pie on the Good Food site. It sounded pretty simple but the end result was greater than the sum of its parts. The chicken is used alongside mushrooms, leek and bacon in an easy to make sauce. It was genuinely impressive and a really good way of using up leftovers. I will absolutely be making this again in the future.

KB rating 8.5/10. PR rating 8/10

Chicken Pie (serves 4)

Ingredients:

  • 1 packet of ready rolled puff pastry
  • Half a cooked chicken (or turkey)
  • 1 leek, chopped (or onion)
  • ½ packet of smoked streaky bacon cut into little pieces
  • ¾ oz sliced mushrooms
  • 1 vegetable stock cube dissolved in 1 cup of water (approx 240ml)
  • ½ cup milk (approx 120ml)
  • 1 oz plain flour
  • ½ oz butter and a little oil (vegetable or olive)

Method:

Chicken Pie Portion

Chicken Pie Portion

Strip carcass of chicken, cutting meat into large pieces. If you prefer you can buy uncooked boneless chicken but you would need to pre-cook it at this stage.

Saute leek (or onion), bacon and mushrooms in the butter and oil. When soft, add flour.

Add stock, stirring continuously then add the milk so that the sauce is rich and creamy. If the sauce is a little thick, add more liquid.

Add the pre-cooked chicken, and stir carefully until meat is completed coated and empty contents into a large pie dish.

Cover with pastry, making a vent in the pie top, and brush with milk.

Bake in oven on a high temperature (200C/400F/gas 6) for around 25 mins or until golden.

Tip: With the stockcube and bacon, there is no need for extra seasoning however, you could substitute some of the stock with a little leftover white wine.


1 Comment

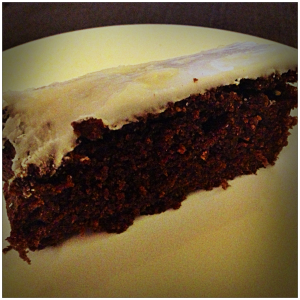
Fresh Gingerbread with Lemon Icing

Fresh Gingerbread with Lemon Icing, ‘How to Be a Domestic Goddess’, Nigella Lawson

Fresh Gingerbread with Lemon Icing, ‘How to Be a Domestic Goddess’, Nigella Lawson

Another recipe from Nigella’s ‘How to be A Domestic Goddess’ and another winner! I am a big fan of traditional gingerbread (ie the cake version, not the biscuit version) and this recipe somehow reminded me of the Northern gingerbread I grew up loving! It’s made me think of digging out a recipe for Parkin that I used to eat on Bonfire Night each year! The addition of the lemon icing really works well here by freshening up the cake, which has quite a deep/earthy flavour on its own. This was a simple recipe to follow, and would be really nice for a bake sale or similar!

KB rating 8.5/10. PR rating 8.5/10

Fresh Gingerbread with Lemon Icing (makes 20 squares)

Ingredients:

For the gingerbread

  • 150g unsalted butter
  • 125g dark muscovado sugar
  • 200g golden syrup
  • 200g black treacle
  • 2 tsp fresh ginger, finely grated
  • 1 tsp ground cinnamon
  • 250ml milk
  • 2 large eggs, beaten to mix
  • 1 tsp bicarbonate of soda, dissolved in 2 tbsp warm water
  • 300g plain flour
  • Roasting tin, approx 30 x 20 x 5cm, greased and lined with Bake-O-Glide, foil or parchment

For the icing

  • 1 tbsp lemon juice
  • 175g icing sugar, sieved
  • 1 tbsp warm water

Method:

Preheat the oven to 170C/gas mark 3.

In a saucepan, melt the butter along with the sugar, golden syrup, treacle, ginger and cinnamon. Off the heat, add the milk, eggs and bicarbonate of soda in its water.

Measure the flour out into a bowl and pour in the liquid ingredients, beating until well mixed (it will be a very liquid batter). Pour it into the tin and bake for ¾ – 1hr until risen and firm. Be careful not to overcook it, as it is nicer a little stickier, and anyway will carry on cooking as it cools.

When it is cool, get on with icing. Whisk the lemon juice into the icing sugar first, then gradually add the water. You want a good, thick icing, so go cautiously and be prepared not to add all the water. Spread over the cooled gingerbread with a palette knife and leave to set before cutting.


Leave a comment

Sticky Chicken with Sesame and Chilli

Sticky Chicken with Sesame and Chilli, Katie Quinn 'What Katie Ate'

Sticky Chicken with Sesame and Chilli, Katie Quinn Davies ‘What Katie Ate’

Sometimes it’s nice to make a dinner in the middle of the week that involves little more than putting some choice ingredients into a single pan and ending up with a tasty meal. And it would seem that Katie Quinn in her book What Katie Ate (see her brilliant blog here) wholeheartedly agrees. She mentions that, whilst the ingredients list for her Sticky Chicken with Sesame and Chilli recipe looks very long, you’ll likely have the majority in the cupboard already. And I agree. This is really nice combination of flavours and it’s definitely going to go on my ‘go to midweek dinner’ recipe list! I do recommend including the garnish here – the chilli and sesame really finishes off the dish properly. It’s not just for show!

KB rating 7.5/10 PR rating 8/10

Sticky Chicken with Sesame and Chilli (serves 4)

Ingredients:

  • 1kg chicken drumsticks and wings
  • Sea salt and fresh pepper
  • 1 tbsp olive oil
  • 1 small red onion, finely diced
  • 3 garlic cloves, finely chopped
  • 250ml tomato ketchup
  • 140g wholegrain mustard
  • 120g runny honey
  • 2 tbsp brown sugar
  • 1 tbsp smoked paprika
  • 1 tsp cayenne pepper
  • 3 tbsp Worcestershire sauce
  • 3 tbsp balsamic vinegar
  • Handful each sesame seeds and finely sliced long green chilli, to garnish
  • Steamed basmati rice, to serve

Method:

Start by removing the skin from the drumsticks. Using a sharp knife, cut the skin all the way around the circumference of the drumstick at the narrowest point of the leg (just above the knuckle bone). Slip your fingers under the skin to loosen it, then pull it up and off the flesh and over the other end of the bone. There will still be skin on the knuckle bone at the end, but don’t worry about this. The main aim is to get the skin off the fleshy part of the leg. Don’t bother skinning the wings – life is too short. Place the skinned drumsticks and wings in a roasting tin and season with salt and pepper.

Preheat the oven to 160C fan, 180C, gas mark 6.

Heat the olive oil in a deep frying pan over a medium heat, add the onion and cook for 5 mins. Add the garlic and cook for a further 5 mins. Reduce the heat to low and add the ketchup, mustard, honey, sugar, paprika, cayenne pepper, Worcestershire sauce and balsamic vinegar. Stir together thoroughly, then increase the heat to medium and simmer for 5 mins. Pour the sauce evenly over the chicken in the roasting tin.

Transfer the tin to the oven and cook, basting often for 1¼ – 1½ hours or until the chicken is cooked through and sticky on the outside. Garnish with a scattering of sesame seeds and green chilli, and serve with basmati rice.


Leave a comment

Béarnaise Sauce

Whilst I’m on the topic of sauces for steak, I thought I’d give a homemade Béarnaise sauce a go. It’s my absolute favourite sauce with steak but I’ve always bought this rather than try and make it myself. I have to be honest – it was not smooth sailing. The first batch split. The second batch also split! But by this point I had no time to try again, so did a bit of googling and found a few methods of how to rescue a split Béarnaise. One worked! So whilst it was a very stressful kitchen experience, I’ve learnt a few valuable lessons. I recommend having your pan of water barely simmering – too much heat and it’s game over. It just needs to warm the bowl up enough to allow the butter to melt.

I would argue it is worth making your own Béarnaise – it does taste fantastic, and I reckon with a bit of practice it won’t be too much of a faff.

So the recipe is below, and then the rescue remedy that worked for me in case you have the same issue!

KB rating 7.5/10. PR 8/10

Béarnaise Sauce (serves 4)

Ingredients:

  • 15g tarragon, finely chopped
  • 2 shallots, finely chopped
  • 3 tbsp white wine vinegar
  • ½ tsp black peppercorns
  • 1 tbsp water
  • 3 egg yolks
  • 200g unsalted butter, softened and cut into 1cm cubes
  • Salt and pepper

Method:

Put a quarter of the tarragon into a small saucepan with the shallots, peppercorns, vinegar and water. Bring to a bubble and then reduce until the liquid is 1 tbsp worth.

Heat a medium saucepan with 5cm water until simmering. Put egg yolks in a bowl sat over the water (make sure the bowl doesn’t touch the water), strain the vinegar mix into the yolks and whisk lightly to combine.

Whisk in the butter, cube by cube. Only add the next cube of butter when the previous one has melted fully into the sauce. Keep an eye on your water temperature, do not let the mixture split. Keep going until the sauce is thick and glossy. When the last of the butter goes in, add the remaining tarragon. Serve immediately if possible, although this will rest for 30 minutes off the heat but still over the hot water.

How to rescue a split bearnaise sauce!

There’s a few options. The first is to take off the heat, set the bowl in about an inch of cold water, add 1 tbsp of cold water to the mix, and whisk rapidly.

If that doesn’t work (and it didn’t for me), try Plan C…

Take the mixture off the heat and set on an angle to allow the oily mixture to be drained off the egg mix (make sure you retain BOTH bits!). In a fresh bowl add 2 tbsp of water. Then add the egg mix 1 tbsp at a time, whisking rapidly to create a smooth mix. Once all the egg mix is incorporate, start adding the drained off oil, one tbsp at a time – each time making sure the mix is fully incorporated before adding the next batch. If you had any butter still to add (and I did, mine split around the halfway point!), start adding again as before, and put the bowl back on top of the simmering water. But be even more aware of temperature – keep it warm enough to melt the butter and no more.